GeoMoose Workshop
About this workshop
Learn how to install GeoMoose, add data to the application, and customize the look and feel.
This workshop assumes the use of MS4W as the installation platform. GeoMoose is Linux/UNIX/OS-X friendly and is, in fact, developed on Linux but the install on Linux is out of the scope of this workshop.
Who is this workshop for?
Anyone wanting to have a WebGIS application for their users.
“GIS Admins” - People who have data and want to serve it on the web.
Developers who don’t want to repeat themselves.
Installing MS4W
Getting started with MS4W
MapServer for Windows (MS4W) will install the base files required by GeoMoose along with an Apache service to actually serve GeoMoose. Once installed, navigate to localhost for more detail Also, full description of optional packages in the installer are found on ms4w.com.
Requirements:
A computer running Windows 7 or newer.
A copy of MS4W. Download Here.
Install MS4W
Double click the ms4w-3.2.7-setup.exe icon.
Ensure the checkbox for GeoMoose 3.2.0 is checked.
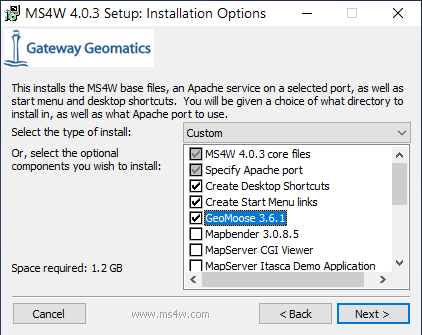
ms4w setup screen 1
Select “C:\”
The MapServer for Windows installer will prompt for a path. GeoMoose is
set up and expects to run from the default path
(C:\ms4w\apps\gm3\htdocs\), so please leave it set to C:\. This
will also make all future updates and enhancements to the application
simpler.
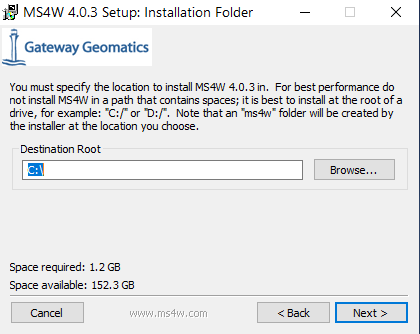
ms4w setup screen 2
Keep it real, Keep it Port 80
Lastly, MapServer for Windows will ask to specify the Apache port. There is no reason to change this unless port 80 is already in use. Also, if you install another web service in the future that uses port 80, you may want to reconfigure it to run a different port.
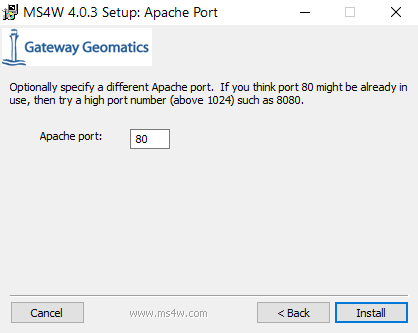
ms4w setup screen 3
Open MS4W!
You can validate the ms4w installation by navigating to localhost, where you will be greeted by the MS4W MapServer introduction and features.
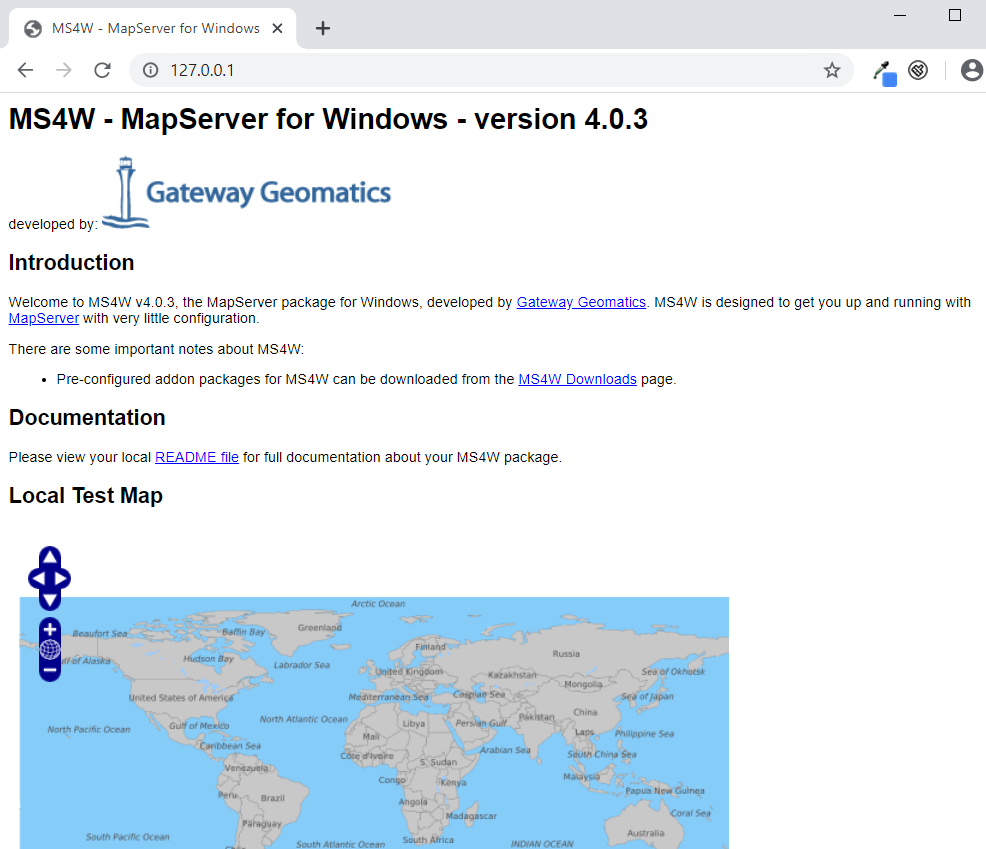
working ms4w
Find the GeoMoose listing
GeoMoose will now show up on the MS4W localhost page under applications
geomoose listing
Click a link to launch the Desktop or Mobile version of GeoMoose.
Look at that!
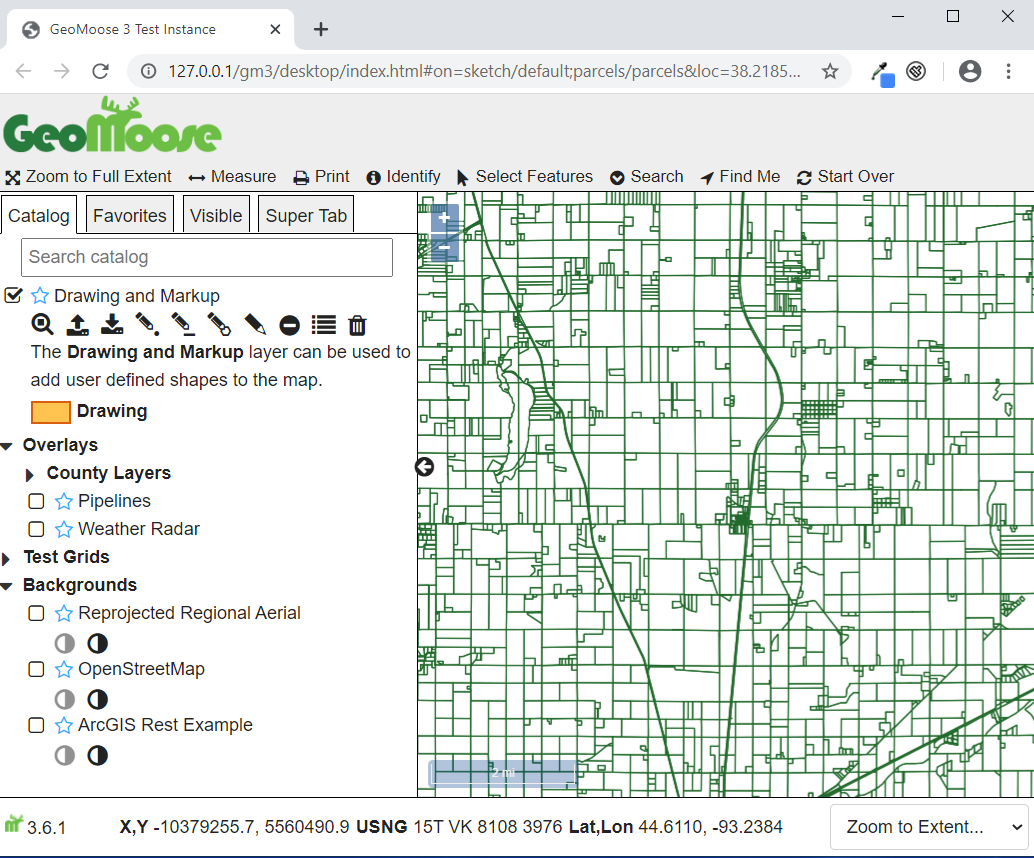
geomoose desktop
Time to play
Learning the insides of GeoMoose
GeoMoose vocabulary
GeoMoose - Javascript SDK
Mapbook XML - Main configuration file.
Has
map-sourceentries.Defines the catalog and toolbar.
Mapfile - OSGeo MapServer configuration files.
‘Application JS’ or
app.js- File that defines the actual application behaviour.‘Application HTML’ - Usually
index.html, defines the look and feel of the application, includes all the Javascript files.
Visual of GeoMoose app structure
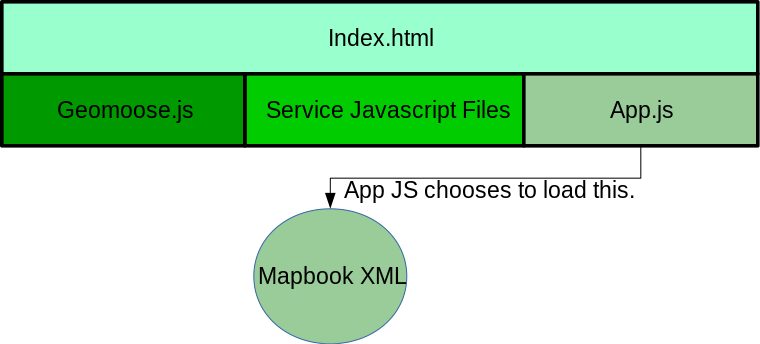
GeoMoose Application Structure
Darker shading indicates the degree of affect for files during a GeoMoose 3 upgrade.
What does the app look like?
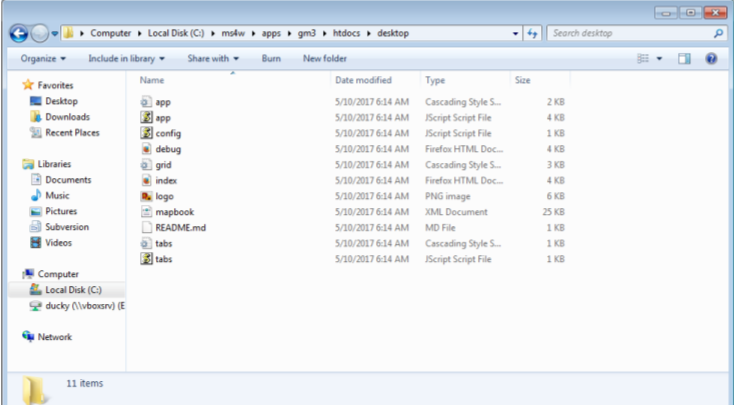
GeoMoose Application Directory
Starting a fresh GeoMoose Application
Goto
C:\ms4w\apps\gm3\htdocs.Copy
desktop/toworkshop/.Open the new http://localhost/gm3/workshop/
Adding a MapServer source
What is MapServer?
Lightweight, OGC standards compliant, CGI-based map rendering engine.
Configured with “Mapfiles”
GeoMoose provides shortcuts for working with MapServer as a WMS using its type=”mapserver” map-sources.
Batteries are included with Firestations
The firestations layer is included with the GeoMoose 3 Demo Data.
Open
C:\ms4w\apps\gm3\htdocs\workshop\mapbook.xmlAdd the following after line 5:
<map-source name="firestations" type="mapserver">
    <file>./demo/firestations/firestations.map</file>
    <layer name="fire_stations"/>
</map-source>
This will add the
firestationssource with afire_stationslayer.
The firestations.map file
firestations.map can be found installed on
C:\ms4w\apps\gm3-demo-data\demo\firestations\firestations.map.
Mapfile “preamble”
MAP
    # Include commonly re-used GeoMoose parameters
    INCLUDE '../../geomoose_globals.map'

    # The web section defines more metadata for the map
    # that can be used with OGC services.
    WEB
        METADATA
            'ows_title' 'County Firestations'
            INCLUDE '../../common_metadata.map'
        END
    END
firestations.map - Layer definition
LAYER
    NAME 'fire_stations'
    STATUS ON
    METADATA
        'ows_title' 'Fire Stations'
        'ows_include_items' 'all'
        'gml_include_items' 'all'
        'ows_exclude_items' 'SHAPE_area,SHAPE_len'
        'gml_exclude_items' 'SHAPE_area,SHAPE_len'
    END
    TYPE POINT
    DATA 'firestations'
    PROJECTION
        'init=epsg:26915'
    END
    CLASS
        NAME 'Fire Stations'
        STYLE
            COLOR 254 0 0
            SYMBOL 'star'
            SIZE 8
        END
    END
    TOLERANCE 10
    TEMPLATE 'dummy'
END # End of Layer
firestations.map - End of the map!
END # End of Map
Add Firestations to the catalog
GeoMoose separates the difference between the source-data with
<map-source />es and presentation with the use of the<catalog>.In
mapbook.xmlgoto line 445 and add the following on the next line:<layer src="firestations/fire_stations" title="Firestations"/>
This will add the
fire_stationslayer of thefirestationssource to the catalog with the label “Firestations”.
“Hard” Reload the Browser or clear-the-cache and reload. Pro tip: Chrome can be very aggressive at caching AJAX loaded XML.
The catalog should now have a ‘Firestations’ layer at the top!

Firestations in the catalog
Adding identify to Firestations
WMS has the GetFeatureInfo request which GeoMoose will use to fetch feature data.
For a layer to work with identify it needs to have a
<template>namedidentifyIn the
mapbook.xmlfile update thefirestations<map-source>definition:
<map-source name="firestations" type="mapserver">
    <file>./demo/firestations/firestations.map</file>
    <layer name="fire_stations">
        <template name="identify"><![CDATA[
        <div class="result-item">
            <div class="result-title">
            Firestation
            </div>
            <b>Station City:</b> {{ properties.Dak_GIS__4 }}<br>
            <b>Station Number:</b> {{ properties.Dak_GIS__5 }}<br>
        </div>
        ]]></template>
    </layer>
</map-source>
More information on templates
GeoMoose has a rich template system provided by Mark.up. More information on GeoMoose templates here.
Features in GeoMoose are processed through the templates as GeoJSON. For example:
{
  "type": "Feature",
  "geometry": {
      "type": "Point",
      "coordinates": [0, 0]
  },
  "properties": {
      "label": "Null Island",
      "partyScope": 555
  }
}
How does identify work?
It’s included in the
index.htmlfile:<script type="text/javascript" src="../geomoose/dist/services/identify.js"></script>
Then registered in the
app.jsfile:app.registerService('identify', IdentifyService);
And finally, put on the toolbar in the
mapbook.xmlfile.<tool name="identify" title="Identify" type="service"/>
Learning more about identify and services
Open
geomoose/dist/services/identify.jsin an editor.From the GeoMoose website, services are defined as:
A service is used to collect information from the user and the map then use that information to generate a query. After the query has executed, the results are then rendered into HTML.
Not all
<map-source>es are equal! Previous versions of GeoMoose used PHP to query data. Now, GeoMoose uses WMS, WFS, and ArcGIS FeatureServices to perform those queries. To get full querying capabilities from a layer it needs to have amapserver-wfs,wfsorags-vectorsource.
Adding select
To be able to select features from a layer it needs to be configured as WFS.
The following needs added after line 5 in
mapbook.xml:
<map-source name="firestations-wfs" type="mapserver-wfs">
    <file>./demo/firestations/firestations.map</file>
    <param name="typename" value="ms:fire_stations" />
    <layer name="fire_stations" selectable="true" title="Firestations">
        <template name="select"><![CDATA[
        <div class="result-item">
            <div class="result-title">
            Firestation
            </div>
            <b>Station City:</b> {{ properties.Dak_GIS__4 }}<br>
            <b>Station Number:</b> {{ properties.Dak_GIS__5 }}<br>
        <div>
        ]]></template>
    </layer>
</map-source>
Tweak the raster Firestations layer
The vector version of the layer needs to be “referenced” by the raster version.
From:
<layer name="fire_stations">
To:
<layer name="fire_stations" query-as="firestations-wfs/fire_stations">
Reload and select Firestations
Back in the browser, reload the page, and click ‘Select’ from the toolbar.
Use the dropdown to select “Firestations”, draw a Polygon on the map, and click “Go”.
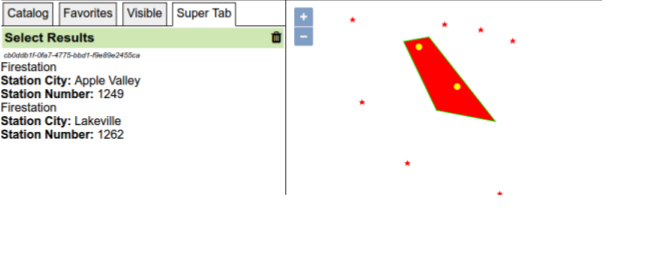
Selecting firestations
More on vector layers
GeoMoose 3 has been designed with a “vector first” philosophy.
MapBox GL Styles can be used to style vector layers for rendering in the browser.
There are additional examples in the example
mapbook.xml.
Customizing the GeoMoose application
Configuring GeoMoose components
Open
app.jsin an editor.The gm3.Application’s
addfunction accepts three parameters:
The component class.
The DOM element ID where the component.
The optional properties for the component.
Configure Coordinate Display
The coordinate display shows the mouse position as the user moves the cursor across the map.
This X,Y is in the map’s configured coordinate system. As the examples are configured to use the Google Maps projection, that is not going to be useful.
In
app.json line 60, you can see the definition of the UTM-15 projection:app.addProjection({ ref: 'EPSG:26915', def: '+proj=utm +zone=15 +ellps=GRS80 +datum=NAD83 +units=m +no_defs' });
To use UTM-15 make the following change:
ref: 'xy'
to:
ref: 'EPSG:26915'
GeoMoose is very HTML, such CSS.
Chrome and Firefox both have excellent DOM/CSS Inspection tools.
Let’s tweak the toolbar!
Let’s assume ‘Find Me’ does not need a label.
In
C:\ms4w\apps\gm3\htdocs\workshop\create a newsite.cssfile.Add the following:
.toolbar .tool.findme .label {
    display: none;
}
Now add the cite.css file to our HTML
Luckily GeoMoose has envisioned the need to customize the look!
Change line 9 of `index.html from:
<!--link rel="stylesheet" type="text/css" href="site.css"/-->
To:
<link rel="stylesheet" type="text/css" href="site.css"/>
And change the icon!
/* Remove the webfont icon */
.toolbar .tool.findme .icon:before {
    content: '';
}

/* Add the moose! */
.toolbar .tool.findme .icon {
    width: 1em;
    height: 1em;
    box-sizing: border-box;
    background-image: url(./logo-mini.png);
}
More info is available in the GeoMoose How-to style the toolbar guide.
Put a sweet gradient on the header
#header {
    background: linear-gradient(to right, lightgreen, grey);
}
Adding a GeoJSON file
Getting a GeoJSON file
GeoJSON files are stored statically! No MapServer is involved in the serving or rendering of a GeoJSON file with GeoMoose.
A great example is the cities.geojson file. It can be downloaded
from
here
and placed in the the workshop/ directory.
Add the new map-source
In mapbook.xml after line 5 add:
<map-source name="cities" type="geojson">
    <url>./cities.geojson</url>
    <layer name="all-cities">
        <style><![CDATA[
        {
            "circle-radius" : 5,
            "circle-color": "blue",
            "text-font": ["Arial", "Open Sans Regular"],
            "text-field": "{city}",
            "text-justify": "right",
            "text-anchor": "right"
        }
        ]]></style>
    </layer>
</map-source>
Add cities to the catalog
Find
<catalog>in the mapbook.After the
<catalog>tag add:<layer src="cities/all-cities" title="World Cities" />
Important notes on GeoJSON layers
They cannot yet be used for querying.
They are styled using a subset of MapBox GL Styles.
The package used by GeoMoose to translate the MapBox GL styles to OpenLayers styles is actively being updated and GeoMoose will follow its progress.